centos7 php7.1安装pecl install v8js扩展失败
已经安装了v8-devel还是失败,怎么办?
yum install v8-devel
centos7 php7.1安装pecl install v8js扩展失败
已经安装了v8-devel还是失败,怎么办?
yum install v8-devel
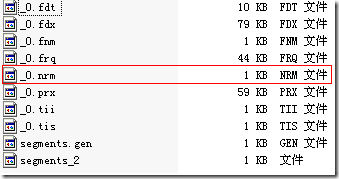
Lucene索引阶段设置Document Boost和Field Boost 实现合理打分
原文地址:http://blog.csdn.net/yja886/article/details/6612104
如果希望某些文档和某些域比其他的域更重要,如果此文档和此域包含所要查询的词则应该得分较高,则可以在索引阶段设定文档的boost和域的boost值。
这些值是在索引阶段就写入索引文件的,存储在标准化因子(.nrm)文件中,一旦设定,除非删除此文档,否则无法改变。
如果不进行设定,则Document Boost和Field Boost默认为1。
Document Boost及FieldBoost的设定方式如下:
| Document doc = new Document();
Field f = new Field(“contents”, “hello world”, Field.Store.NO, Field.Index.ANALYZED); f.setBoost(100); doc.add(f); doc.setBoost(100); |
两者是如何影响Lucene的文档打分的呢?
让我们首先来看一下Lucene的文档打分的公式:
| score(q,d) = coord(q,d) · queryNorm(q) · ∑( tf(t in d) · idf(t)2 · t.getBoost() · norm(t,d) )
t in q |
Document Boost和Field Boost影响的是norm(t, d),其公式如下:
norm(t,d) = doc.getBoost() · lengthNorm(field) · ∏f.getBoost()
field f in d named as t |
它包括三个参数:
其中第三个参数可以在自己的Similarity中影响打分,下面会论述。
当然,也可以在添加Field的时候,设置Field.Index.ANALYZED_NO_NORMS或Field.Index.NOT_ANALYZED_NO_NORMS,完全不用norm,来节约空间。
根据Lucene的注释,No norms means that index-time field and document boosting and field length normalization are disabled. The benefit is less memory usage as norms take up one byte of RAM per indexed field for every document in the index, during searching. Note that once you index a given field with norms enabled, disabling norms will have no effect. 没有norms意味着索引阶段禁用了文档boost和域的boost及长度标准化。好处在于节省内存,不用在搜索阶段为索引中的每篇文档的每个域都占用一个字节来保存norms信息了。但是对norms信息的禁用是必须全部域都禁用的,一旦有一个域不禁用,则其他禁用的域也会存放默认的norms值。因为为了加快norms的搜索速度,Lucene是根据文档号乘以每篇文档的norms信息所占用的大小来计算偏移量的,中间少一篇文档,偏移量将无法计算。也即norms信息要么都保存,要么都不保存。
下面几个试验可以验证norms信息的作用:
试验一:Document Boost的作用
| public void testNormsDocBoost() throws Exception { File indexDir = new File(“testNormsDocBoost”); IndexWriter writer = new IndexWriter(FSDirectory.open(indexDir), new StandardAnalyzer(Version.LUCENE_CURRENT), true, IndexWriter.MaxFieldLength.LIMITED); writer.setUseCompoundFile(false); Document doc1 = new Document(); Field f1 = new Field(“contents”, “common hello hello”, Field.Store.NO, Field.Index.ANALYZED); doc1.add(f1); doc1.setBoost(100); writer.addDocument(doc1); Document doc2 = new Document(); Field f2 = new Field(“contents”, “common common hello”, Field.Store.NO, Field.Index.ANALYZED_NO_NORMS); doc2.add(f2); writer.addDocument(doc2); Document doc3 = new Document(); Field f3 = new Field(“contents”, “common common common”, Field.Store.NO, Field.Index.ANALYZED_NO_NORMS); doc3.add(f3); writer.addDocument(doc3); writer.close(); IndexReader reader = IndexReader.open(FSDirectory.open(indexDir)); |
如果第一篇文档的域f1也为Field.Index.ANALYZED_NO_NORMS的时候,搜索排名如下:
| docid : 2 score : 1.2337708 docid : 1 score : 1.0073696 docid : 0 score : 0.71231794 |
如果第一篇文档的域f1设为Field.Index.ANALYZED,则搜索排名如下:
| docid : 0 score : 39.889805 docid : 2 score : 0.6168854 docid : 1 score : 0.5036848 |
试验二:Field Boost的作用
如果我们觉得title要比contents要重要,可以做一下设定。
| public void testNormsFieldBoost() throws Exception { File indexDir = new File(“testNormsFieldBoost”); IndexWriter writer = new IndexWriter(FSDirectory.open(indexDir), new StandardAnalyzer(Version.LUCENE_CURRENT), true, IndexWriter.MaxFieldLength.LIMITED); writer.setUseCompoundFile(false); Document doc1 = new Document(); Field f1 = new Field(“title”, “common hello hello”, Field.Store.NO, Field.Index.ANALYZED); f1.setBoost(100); doc1.add(f1); writer.addDocument(doc1); Document doc2 = new Document(); Field f2 = new Field(“contents”, “common common hello”, Field.Store.NO, Field.Index.ANALYZED_NO_NORMS); doc2.add(f2); writer.addDocument(doc2); writer.close(); IndexReader reader = IndexReader.open(FSDirectory.open(indexDir)); |
如果第一篇文档的域f1也为Field.Index.ANALYZED_NO_NORMS的时候,搜索排名如下:
| docid : 1 score : 0.49999997 docid : 0 score : 0.35355338 |
如果第一篇文档的域f1设为Field.Index.ANALYZED,则搜索排名如下:
| docid : 0 score : 19.79899 docid : 1 score : 0.49999997 |
试验三:norms中文档长度对打分的影响
| public void testNormsLength() throws Exception { File indexDir = new File(“testNormsLength”); IndexWriter writer = new IndexWriter(FSDirectory.open(indexDir), new StandardAnalyzer(Version.LUCENE_CURRENT), true, IndexWriter.MaxFieldLength.LIMITED); writer.setUseCompoundFile(false); Document doc1 = new Document(); Field f1 = new Field(“contents”, “common hello hello”, Field.Store.NO, Field.Index.ANALYZED_NO_NORMS); doc1.add(f1); writer.addDocument(doc1); Document doc2 = new Document(); Field f2 = new Field(“contents”, “common common hello hello hello hello”, Field.Store.NO, Field.Index.ANALYZED_NO_NORMS); doc2.add(f2); writer.addDocument(doc2); writer.close(); IndexReader reader = IndexReader.open(FSDirectory.open(indexDir)); |
当norms被禁用的时候,包含两个common的第二篇文档打分较高:
| docid : 1 score : 0.13928263 docid : 0 score : 0.09848769 |
当norms起作用的时候,虽然包含两个common的第二篇文档,由于长度较长,因而打分较低:
| docid : 0 score : 0.09848769 docid : 1 score : 0.052230984 |
试验四:norms信息要么都保存,要么都不保存的特性
| public void testOmitNorms() throws Exception { File indexDir = new File(“testOmitNorms”); IndexWriter writer = new IndexWriter(FSDirectory.open(indexDir), new StandardAnalyzer(Version.LUCENE_CURRENT), true, IndexWriter.MaxFieldLength.LIMITED); writer.setUseCompoundFile(false); Document doc1 = new Document(); Field f1 = new Field(“title”, “common hello hello”, Field.Store.NO, Field.Index.ANALYZED); doc1.add(f1); writer.addDocument(doc1); for (int i = 0; i < 10000; i++) { Document doc2 = new Document(); Field f2 = new Field(“contents”, “common common hello hello hello hello”, Field.Store.NO, Field.Index.ANALYZED_NO_NORMS); doc2.add(f2); writer.addDocument(doc2); } writer.close(); } |
当我们添加10001篇文档,所有的文档都设为Field.Index.ANALYZED_NO_NORMS的时候,我们看索引文件,发现.nrm文件只有1K,也即其中除了保持一定的格式信息,并无其他数据。
当我们把第一篇文档设为Field.Index.ANALYZED,而其他10000篇文档都设为Field.Index.ANALYZED_NO_NORMS的时候,发现.nrm文件又10K,也即所有的文档都存储了norms信息,而非只有第一篇文档。

在搜索中,我们可以指定,某些词对我们来说更重要,我们可以设置这个词的boost:
common^4 hello |
使得包含common的文档比包含hello的文档获得更高的分数。
由于在Lucene中,一个Term定义为Field:Term,则也可以影响不同域的打分:
| title:common^4 content:common |
使得title中包含common的文档比content中包含common的文档获得更高的分数。
实例:
| public void testQueryBoost() throws Exception { File indexDir = new File(“TestQueryBoost”); IndexWriter writer = new IndexWriter(FSDirectory.open(indexDir), new StandardAnalyzer(Version.LUCENE_CURRENT), true, IndexWriter.MaxFieldLength.LIMITED); Document doc1 = new Document(); Field f1 = new Field(“contents”, “common1 hello hello”, Field.Store.NO, Field.Index.ANALYZED); doc1.add(f1); writer.addDocument(doc1); Document doc2 = new Document(); Field f2 = new Field(“contents”, “common2 common2 hello”, Field.Store.NO, Field.Index.ANALYZED); doc2.add(f2); writer.addDocument(doc2); writer.close(); IndexReader reader = IndexReader.open(FSDirectory.open(indexDir)); |
根据tf/idf,包含两个common2的第二篇文档打分较高:
| docid : 1 score : 0.24999999 docid : 0 score : 0.17677669 |
如果我们输入的查询语句为:”common1^100 common2″,则第一篇文档打分较高:
| docid : 0 score : 0.2499875 docid : 1 score : 0.0035353568 |
那Query Boost是如何影响文档打分的呢?
根据Lucene的打分计算公式:
| score(q,d) = coord(q,d) · queryNorm(q) · ∑( tf(t in d) · idf(t)2 · t.getBoost() · norm(t,d) )
t in q |
注:在queryNorm的部分,也有q.getBoost()的部分,但是对query向量的归一化(见向量空间模型与Lucene的打分机制[http://forfuture1978.javaeye.com/blog/588721])。
Similariy是计算Lucene打分的最主要的类,实现其中的很多借口可以干预打分的过程。
(1) float computeNorm(String field, FieldInvertState state)
(2) float lengthNorm(String fieldName, int numTokens)
(3) float queryNorm(float sumOfSquaredWeights)
(4) float tf(float freq)
(5) float idf(int docFreq, int numDocs)
(6) float coord(int overlap, int maxOverlap)
(7) float scorePayload(int docId, String fieldName, int start, int end, byte [] payload, int offset, int length)
它们分别影响Lucene打分计算的如下部分:
| score(q,d) = (6)coord(q,d) · (3)queryNorm(q) · ∑( (4)tf(t in d) · (5)idf(t)2 · t.getBoost() · (1)norm(t,d) )
t in q |
norm(t,d) = doc.getBoost() · (2)lengthNorm(field) · ∏f.getBoost()
field f in d named as t |
下面逐个进行解释:
(1) float computeNorm(String field, FieldInvertState state)
影响标准化因子的计算,如上述,他主要包含了三部分:文档boost,域boost,以及文档长度归一化。此函数一般按照上面norm(t, d)的公式进行计算。
(2) float lengthNorm(String fieldName, int numTokens)
主要计算文档长度的归一化,默认是1.0 / Math.sqrt(numTerms)。
因为在索引中,不同的文档长度不一样,很显然,对于任意一个term,在长的文档中的tf要大的多,因而分数也越高,这样对小的文档不公平,举一个极端的例子,在一篇1000万个词的鸿篇巨著中,”lucene”这个词出现了11次,而在一篇12个词的短小文档中,”lucene”这个词出现了10次,如果不考虑长度在内,当然鸿篇巨著应该分数更高,然而显然这篇小文档才是真正关注”lucene”的。
因而在此处是要除以文档的长度,从而减少因文档长度带来的打分不公。
然而现在这个公式是偏向于首先返回短小的文档的,这样在实际应用中使得搜索结果也很难看。
于是在实践中,要根据项目的需要,根据搜索的领域,改写lengthNorm的计算公式。比如我想做一个经济学论文的搜索系统,经过一定时间的调研,发现大多数的经济学论文的长度在8000到10000词,因而lengthNorm的公式应该是一个倒抛物线型的,8000到10000词的论文分数最高,更短或更长的分数都应该偏低,方能够返回给用户最好的数据。
(3) float queryNorm(float sumOfSquaredWeights)
这是按照向量空间模型,对query向量的归一化。此值并不影响排序,而仅仅使得不同的query之间的分数可以比较。
(4) float tf(float freq)
freq是指在一篇文档中包含的某个词的数目。tf是根据此数目给出的分数,默认为Math.sqrt(freq)。也即此项并不是随着包含的数目的增多而线性增加的。
(5) float idf(int docFreq, int numDocs)
idf是根据包含某个词的文档数以及总文档数计算出的分数,默认为(Math.log(numDocs/(double)(docFreq+1)) + 1.0)。
由于此项计算涉及到总文档数和包含此词的文档数,因而需要全局的文档数信息,这给跨索引搜索造成麻烦。
从下面的例子我们可以看出,用MultiSearcher来一起搜索两个索引和分别用IndexSearcher来搜索两个索引所得出的分数是有很大差异的。
究其原因是MultiSearcher的docFreq(Term term)函数计算了包含两个索引中包含此词的总文档数,而IndexSearcher仅仅计算了每个索引中包含此词的文档数。当两个索引包含的文档总数是有很大不同的时候,分数是无法比较的。
| public void testMultiIndex() throws Exception{ MultiIndexSimilarity sim = new MultiIndexSimilarity(); File indexDir01 = new File(“TestMultiIndex/TestMultiIndex01”); File indexDir02 = new File(“TestMultiIndex/TestMultiIndex02”); IndexReader reader01 = IndexReader.open(FSDirectory.open(indexDir01)); IndexReader reader02 = IndexReader.open(FSDirectory.open(indexDir02)); IndexSearcher searcher01 = new IndexSearcher(reader01); searcher01.setSimilarity(sim); IndexSearcher searcher02 = new IndexSearcher(reader02); searcher02.setSimilarity(sim); MultiSearcher multiseacher = new MultiSearcher(searcher01, searcher02); multiseacher.setSimilarity(sim); QueryParser parser = new QueryParser(Version.LUCENE_CURRENT, “contents”, new StandardAnalyzer(Version.LUCENE_CURRENT)); Query query = parser.parse(“common”); TopDocs docs = searcher01.search(query, 10); System.out.println(“———————————————-“); for (ScoreDoc doc : docs.scoreDocs) { System.out.println(“docid : ” + doc.doc + ” score : ” + doc.score); } System.out.println(“———————————————-“); docs = searcher02.search(query, 10); for (ScoreDoc doc : docs.scoreDocs) { System.out.println(“docid : ” + doc.doc + ” score : ” + doc.score); } System.out.println(“———————————————-“); docs = multiseacher.search(query, 20); for (ScoreDoc doc : docs.scoreDocs) { System.out.println(“docid : ” + doc.doc + ” score : ” + doc.score); } |
| 结果为:
——————————- |
如果几个索引都是在一台机器上,则用MultiSearcher或者MultiReader就解决问题了,然而有时候索引是分布在多台机器上的,虽然Lucene也提供了RMI,或用NFS保存索引的方法,然而效率和并行性一直是一个问题。
一个可以尝试的办法是在Similarity中,idf返回1,然后多个机器上的索引并行搜索,在汇总结果的机器上,再融入idf的计算。
如下面的例子可以看出,当idf返回1的时候,打分可以比较了:
| class MultiIndexSimilarity extends Similarity {
@Override |
| —————————– docid : 0 score : 0.559017 docid : 1 score : 0.559017 docid : 2 score : 0.559017 docid : 3 score : 0.559017 docid : 4 score : 0.559017 docid : 5 score : 0.559017 docid : 6 score : 0.559017 docid : 7 score : 0.559017 —————————– docid : 0 score : 0.559017 docid : 1 score : 0.559017 docid : 2 score : 0.559017 docid : 3 score : 0.559017 docid : 4 score : 0.559017 —————————– docid : 0 score : 0.559017 docid : 1 score : 0.559017 docid : 2 score : 0.559017 docid : 3 score : 0.559017 docid : 4 score : 0.559017 docid : 5 score : 0.559017 docid : 6 score : 0.559017 docid : 7 score : 0.559017 docid : 8 score : 0.559017 docid : 9 score : 0.559017 docid : 10 score : 0.559017 docid : 11 score : 0.559017 docid : 12 score : 0.559017 |
(6) float coord(int overlap, int maxOverlap)
一次搜索可能包含多个搜索词,而一篇文档中也可能包含多个搜索词,此项表示,当一篇文档中包含的搜索词越多,则此文档则打分越高。
| public void TestCoord() throws Exception { MySimilarity sim = new MySimilarity(); File indexDir = new File(“TestCoord”); IndexWriter writer = new IndexWriter(FSDirectory.open(indexDir), new StandardAnalyzer(Version.LUCENE_CURRENT), true, IndexWriter.MaxFieldLength.LIMITED); Document doc1 = new Document(); Field f1 = new Field(“contents”, “common hello world”, Field.Store.NO, Field.Index.ANALYZED); doc1.add(f1); writer.addDocument(doc1); Document doc2 = new Document(); Field f2 = new Field(“contents”, “common common common”, Field.Store.NO, Field.Index.ANALYZED); doc2.add(f2); writer.addDocument(doc2); for(int i = 0; i < 10; i++){ Document doc3 = new Document(); Field f3 = new Field(“contents”, “world”, Field.Store.NO, Field.Index.ANALYZED); doc3.add(f3); writer.addDocument(doc3); } writer.close(); IndexReader reader = IndexReader.open(FSDirectory.open(indexDir)); |
| class MySimilarity extends Similarity {
@Override } |
如上面的实例,当coord返回1,不起作用的时候,文档一虽然包含了两个搜索词common和world,但由于world的所在的文档数太多,而文档二包含common的次数比较多,因而文档二分数较高:
| docid : 1 score : 1.9059997 docid : 0 score : 1.2936771 |
而当coord起作用的时候,文档一由于包含了两个搜索词而分数较高:
| class MySimilarity extends Similarity {
@Override } |
| docid : 0 score : 1.2936771 docid : 1 score : 0.95299983 |
(7) float scorePayload(int docId, String fieldName, int start, int end, byte [] payload, int offset, int length)
由于Lucene引入了payload,因而可以存储一些自己的信息,用户可以根据自己存储的信息,来影响Lucene的打分。
由payload的定义我们知道,索引是以倒排表形式存储的,对于每一个词,都保存了包含这个词的一个链表,当然为了加快查询速度,此链表多用跳跃表进行存储。Payload信息就是存储在倒排表中的,同文档号一起存放,多用于存储与每篇文档相关的一些信息。当然这部分信息也可以存储域里(stored Field),两者从功能上基本是一样的,然而当要存储的信息很多的时候,存放在倒排表里,利用跳跃表,有利于大大提高搜索速度。
Payload的存储方式如下图:
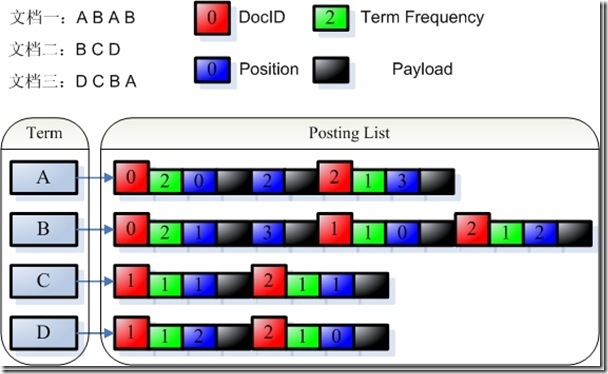
由payload的定义,我们可以看出,payload可以存储一些不但与文档相关,而且与查询词也相关的信息。比如某篇文档的某个词有特殊性,则可以在这个词的这个文档的position信息后存储payload信息,使得当搜索这个词的时候,这篇文档获得较高的分数。
要利用payload来影响查询需要做到以下几点,下面举例用<b></b>标记的词在payload中存储1,否则存储0:
首先要实现自己的Analyzer从而在Token中放入payload信息:
| class BoldAnalyzer extends Analyzer {
@Override } class BoldFilter extends TokenFilter { private TermAttribute termAtt; protected BoldFilter(TokenStream input) { @Override final char[] buffer = termAtt.termBuffer(); String tokenstring = new String(buffer, 0, length); public static int bytes2int(byte[] b) { public static byte[] int2bytes(int num) { } |
然后,实现自己的Similarity,从payload中读出信息,根据信息来打分。
| class PayloadSimilarity extends DefaultSimilarity {
@Override |
最后,查询的时候,一定要用PayloadXXXQuery(在此用PayloadTermQuery,在Lucene 2.4.1中,用BoostingTermQuery),否则scorePayload不起作用。
| public void testPayloadScore() throws Exception { PayloadSimilarity sim = new PayloadSimilarity(); File indexDir = new File(“TestPayloadScore”); IndexWriter writer = new IndexWriter(FSDirectory.open(indexDir), new BoldAnalyzer(), true, IndexWriter.MaxFieldLength.LIMITED); Document doc1 = new Document(); Field f1 = new Field(“contents”, “common hello world”, Field.Store.NO, Field.Index.ANALYZED); doc1.add(f1); writer.addDocument(doc1); Document doc2 = new Document(); Field f2 = new Field(“contents”, “common <b>hello</b> world”, Field.Store.NO, Field.Index.ANALYZED); doc2.add(f2); writer.addDocument(doc2); writer.close(); IndexReader reader = IndexReader.open(FSDirectory.open(indexDir)); |
如果scorePayload函数始终是返回1,则结果如下,<b></b>不起作用。
| It is not a bold char. It is a bold char. docid : 0 score : 0.2101998 docid : 1 score : 0.2101998 |
如果scorePayload函数如下:
| class PayloadSimilarity extends DefaultSimilarity {
@Override |
则结果如下,同样是包含hello,包含加粗的文档获得较高分:
| It is not a bold char. It is a bold char. docid : 1 score : 2.101998 docid : 0 score : 0.2101998 |
以上各种方法,已经把Lucene score计算公式的所有变量都涉及了,如果这还不能满足您的要求,还可以继承实现自己的collector。
在Lucene 2.4中,HitCollector有个函数public abstract void collect(int doc, float score),用来收集搜索的结果。
其中TopDocCollector的实现如下:
| public void collect(int doc, float score) { if (score > 0.0f) { totalHits++; if (reusableSD == null) { reusableSD = new ScoreDoc(doc, score); } else if (score >= reusableSD.score) { reusableSD.doc = doc; reusableSD.score = score; } else { return; } reusableSD = (ScoreDoc) hq.insertWithOverflow(reusableSD); } } |
此函数将docid和score插入一个PriorityQueue中,使得得分最高的文档先返回。
我们可以继承HitCollector,并在此函数中对score进行修改,然后再插入PriorityQueue,或者插入自己的数据结构。
比如我们在另外的地方存储docid和文档创建时间的对应,我们希望当文档时间是一天之内的分数最高,一周之内的分数其次,一个月之外的分数很低。
我们可以这样修改:
| public static long milisecondsOneDay = 24L * 3600L * 1000L;
public static long millisecondsOneWeek = 7L * 24L * 3600L * 1000L; public static long millisecondsOneMonth = 30L * 24L * 3600L * 1000L; public void collect(int doc, float score) { long time = getTimeByDocId(doc); if(time < milisecondsOneDay) { score = score * 1.0; } else if (time < millisecondsOneWeek){ score = score * 0.8; } else if (time < millisecondsOneMonth) { score = score * 0.3; } else { score = score * 0.1; } totalHits++; |
在Lucene 3.0中,Collector接口为void collect(int doc),TopScoreDocCollector实现如下:
| public void collect(int doc) throws IOException { float score = scorer.score(); totalHits++; if (score <= pqTop.score) { return; } pqTop.doc = doc + docBase; pqTop.score = score; pqTop = pq.updateTop(); } |
同样可以用上面的方式影响其打分。
1. 下载、解压
wget http://mirrors.hust.edu.cn/apache/lucene/solr/6.4.1/solr-6.4.1.tgz

tar zxf solr-6.4.1.tgz
2. 安装JAVA运行环境
yum install java-1.8.0-openjdk
==========solr 标准安装方法==============
# 准备数据目录和安装目录
# 数据存放目录
mkdir /mnt/www/solr
# 软件安装目录
mkdir /usr/local/solr
#安装软件和服务
./solr-6.4.1/bin/install_solr_service.sh solr-6.4.1.tgz -d /mnt/www/solr -i /usr/local/solr
# 创建core
su - solr -c "/usr/local/solr/solr/bin/solr create -c doufu"
# 启动停止方法(centos 7)
# 先停止solr
su - solr -c "/usr/local/solr/solr/bin/solr stop"
# 启动solr
systemctl restart solr
# 查看solr运行状态
systemctl status solr
# centos6 可用service控制
service solr start/stop/restart
# 访问Web控制台
http://youip:8983/
# 下一步:
# misc:
[root@web4 solr]# bin/solr --help
Usage: solr COMMAND OPTIONS
where COMMAND is one of: start, stop, restart, status, healthcheck, create, create_core, create_collection, delete, version, zk
Standalone server example (start Solr running in the background on port 8984):
./solr start -p 8984
SolrCloud example (start Solr running in SolrCloud mode using localhost:2181 to connect to Zookeeper, with 1g max heap size and remote Java debug options enabled):
./solr start -c -m 1g -z localhost:2181 -a “-Xdebug -Xrunjdwp:transport=dt_socket,server=y,suspend=n,address=1044”
Pass -help after any COMMAND to see command-specific usage information,
such as: ./solr start -help or ./solr stop -help
./configure … –with-openssl
重新编译或安装加上openssl支持即可
ln -s /var/lib/mysql/mysql.sock /tmp/mysql.sock
SNMP : 简单网络管理协议, 典型的应用就是监控服务器的状态. 例如, 监控宝使用 SNMP 协议监控服务器的状态.
下面介绍 SNMP 服务的安装配置. 官网: http://www.net-snmp.org/
|
1
2
3
4
5
6
7
8
|
yum install net–snmp
#设置开机启动
systemctl enable snmpd
systemctl start snmpd
#查看当前版本, 这里是5.7.2
snmpd –v
|
SNMP支持不同的验证机制,这取决于不同的SNMP协议版本,监控宝目前支持v2c和v3两个版本, 我们使用 v3.
首先停止 snmp 服务
|
1
|
systemctl stop snmpd
|
编辑配置文件
|
1
|
nano /etc/snmp/snmpd.conf
|
在文件末尾添加如下内容
|
1
2
3
4
5
|
#启用只读 v3 用户
rouser user1 auth
#创建用户
createUser user1 MD5 password
|
配置好以后启动服务
|
1
|
systemctl start snmpd
|
启动后 snmp 会检测配置文件, 当检查到有 createUser 参数时, 会创建新用户或替换已经存在的用户, 然后将加密密码保存在 /var/lib/net-snmp/snmpd.conf 文件中
, 再从配置文件中删除这行.
因此要创建新用户或更改密码时只需要停止服务, 在配置文件中加入 createUser 参数, 再次启动服务即可.
添加防火墙规则, 放行 udp 161 端口
|
1
|
nano /etc/sysconfig/iptables
|
将下面的语句放到合适的位置
|
1
|
–A INPUT –p udp –m udp —dport 161 –j ACCEPT
|
保存, 重启 iptables.
|
1
|
systemctl restart iptables
|
至此, snmp 服务配置完成.
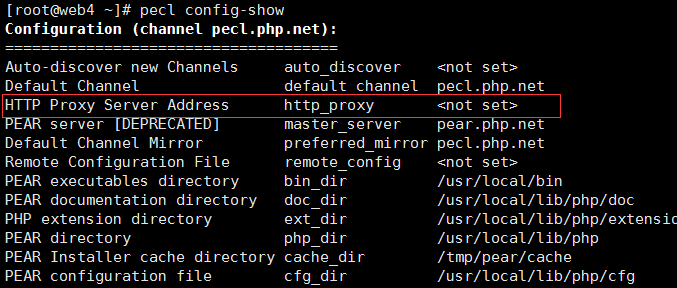
[root@web4 ~]# pecl config-set http_proxy http://test:1080
config-set (http_proxy, http://test:1080, user) failed, channel pecl.php.net
尝试失败
查找资料https://blog.flowl.info/2015/peclpear-behind-proxy-how-to/
换成pear成功。。。。
[root@web4 ~]# pear config-set http_proxy http://test:1080
config-set succeeded
这个应该是个bug pecl的代理要使用pear来设置。。。
# 省略其他配置

http {
    # 省略其他配置

    server {
        # 可用的dns服务器地址
        resolver 10.143.22.118;
        # 监听端口
        listen 1080;
        location / {
            # 一般不需要修改
            proxy_pass http://$http_host$request_uri;
        }
    }
}
# 省略其他配置