Mariadb 修改数据目录,并且打开了SELinux,SELinux配置命令
Job for mariadb.service failed because the control process exited with error code. See “systemctl status mariadb.service” and “journalctl -xe” for details.
MySQL 8.0启动报错,也是这个问题(已经chown了)
mysqld: File ‘./binlog.index’ not found (OS errno 13 – Permission denied)
chcon -R -t mysqld_db_t /mnt/mysql
参考页面:https://www.thegeekstuff.com/2016/05/move-mysql-directory/
Google 应用内购买结算资料
实现应用内购买结算:
https://developer.android.google.cn/google/play/billing/billing_integrate.html?hl=zh-cn
字段参考:
https://developer.android.google.cn/google/play/billing/billing_reference.html?hl=zh-cn#getBuyIntent
# PHP服务端验证
$inappPurchaseData = Request::input('INAPP_PURCHASE_DATA');
$inappDataSignature = Request::input('INAPP_DATA_SIGNATURE');
$googlePublicKey = 'xxxx'; # google后台能获取到的

$publicKey = "-----BEGIN PUBLIC KEY-----" . PHP_EOL . chunk_split($googlePublicKey, 64, PHP_EOL) .
"-----END PUBLIC KEY-----";

$publicKeyHandle = openssl_get_publickey($publicKey);
$verify = openssl_verify($inappPurchaseData, base64_decode($inappDataSignature),
$publicKeyHandle, OPENSSL_ALGO_SHA1);

# $verify == 1 则验证通过, 0 表示验证失败
nginx: [emerg] unknown directive “proxy_set_header X-Forwarded-For $proxy_add_x_forwarded_for” in
$remote_addr 可信时才能信任 X-Forwarded-For、$proxy_add_x_forwarded_for
nginx配置代理转发,部分配置如下
        location / {
            # index index.html index.htm index.php;
            # try_files $uri $uri/ /index.php$request_uri;
            proxy_set_header Host $host;
            #proxy_set_header X-Real-IP $remote_addr;
            #proxy_set_header X-Real-Port $remote_port;
            proxy_set_header X-Forwarded-For $proxy_add_x_forwarded_for;
            proxy_pass https://10.29.185.61:8063;
        }
$proxy_add_x_forwarded_forthe “X-Forwarded-For” client request header field with the $remote_addr variable appended to it, separated by a comma. If the “X-Forwarded-For” field is not present in the client request header, the $proxy_add_x_forwarded_for variable is equal to the $remote_addr variable.
“ X-Forward-For”客户端请求头字段,后面附加 $remote _ addr 变量,中间用逗号分隔。如果客户端请求头中没有“ X-Forward-For”字段,则 $proxy_add_x_forwarded_for 变量等于 $remote_addr 变量。
MySQL GET_LOCK函数实现MySQL加锁
GET_LOCK(str,timeout)
Tries to obtain a lock with a name given by the string str, using a timeout of timeout seconds. A negative timeout value means infinite timeout. The lock is exclusive. While held by one session, other sessions cannot obtain a lock of the same name.
- 尝试使用超时秒数的超时获得一个由字符串str给出的名称的锁。
- 负超时值意味着无限超时。
- 锁是独占的。
- 只能由一个会话持有,其他会话无法获得同名的锁。
参考:https://dev.mysql.com/doc/refman/5.7/en/miscellaneous-functions.html#function_get-lock
参考:https://blog.csdn.net/tangtong1/article/details/51792617
shadowsocks服务端快速搭建
Install (centos7)
yum install python-setuptools && easy_install pip
pip install git+https://github.com/shadowsocks/shadowsocks.git@master
Usage
ssserver -p 443 -k password -m aes-256-cfb
To run in the background:
sudo ssserver -p 443 -k password -m aes-256-cfb --user nobody -d start
To stop:
sudo ssserver -d stop
To check the log:
sudo less /var/log/shadowsocks.log
Error while reading line from the server.
环境:php7.1、centos7、redis3.2.11
故障现象:php命令行环境下blpop 的时候是不是出现:blpop Error while reading line from the server.
blpop的等待时间是设置为了15秒
—-
Redis经常出现Error while reading line from the server.
cat /proc/sys/net/ipv4/tcp_timestamps
发现返回1
将其设置为0
echo 0 > /proc/sys/net/ipv4/tcp_timestamps
参考:http://blog.csdn.net/jueshengtianya/article/details/50440696
net.ipv4.tcp_timestamps=0
说明:时间戳可以避免序列号的卷绕。一个1Gbps的链路肯定会遇到以前用过的序列号。时间戳能够让内核接受这种“异常”的数据包。这里需要将其关掉。
值为0(禁用时间戳)
值为1(启用时间戳)
—-
然而进行以上操作以后还是会出现
configure: error: Your system does not support systemd.
–with-fpm-systemd – 启用 systemd 集成 (默认 – no)
解决方法:
yum install systemd-devel
Detected corrupt BSON data
数据里面看到是乱码
WARNING: Cannot find matching striped segment for vg1/lvMysql.
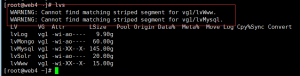
lvextend -L +20G /mnt/mysql
lvextend -L +20G /dev/mapper/vg1-lvMysql
resize2fs /dev/mapper/vg1-lvMysql
扩容一下。没了 一个。
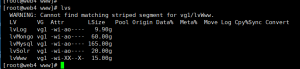
后来,改下名字又改回来警告就消失了
lvrename vg1 lvMysql lvMysql33
lvrename vg1 lvMysql33 lvMysql